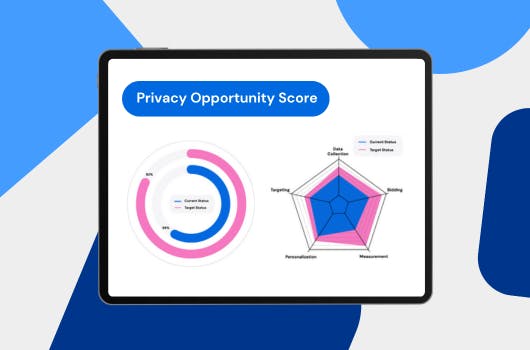
Last night I decided it would be cool to recreate the old in-page analytics functionality in Data Studio by floating key event scorecards over an image of a page. This morning I realised how long that would take, so instead I opted to try and create a scroll depth heat map report using scroll depth events from GA.
This may not be a great solution at scale, but if you're wanting to visualise how far down a couple of key pages users are scrolling this is a pretty neat option. Here is an example of how it's going to look:

In order to do this you will need to be tracking scroll depth in Google Analytics. You can find out how to do that here.
Then, the idea is basically to plot our scroll depth counts in a table, apply the heat map style option to the column and overlay the table over an image of our page.
To make that table, apply the dimension of event label or event action (which ever one contains your scroll % values) and the unique events metric. Then apply a filter to only include event category contains "Scroll Depth" or whatever your scroll depth event category is called. You will also need to add a filter to only show results when page= the page you're reporting on. Lastly, under the style table scroll down to find the column 1 settings and change the drop down from Number to Heat Map.
That should return you something like this:

Now there are a couple of hacky things we need to do to get this in the correct format/order. The first thing you will notice is the darkest heap map panel will be for your baseline or 0% group. We want the inverse, so our baseline is the lightest and our 100% marker is the darkest.
To do this I've created a calculated field to invert the unique event counts. With our table selected you can click the "Create New Field" link in the bottom right corner of the data tab.
In the field editor we just use unique events x (-1).

If we apply this newly created metric to our table, we will now get something like this (you may just need to change the order by settings):

Now we insert our screenshot of our page (I use a chrome plugin called "Full page screen capture" to get this), right click on it, select order and send to back.

This is where it gets a bit messy. As far as I can tell there are no options to resize the table row heights. So what we do is change the table label font size to the largest one possible:

Then we use the insert shape option to cover up the sides with some white rectangles:

The last step then is to add some score cards along side each of the segments to show the counts at each step. So just use the unique events metric and apply a filter to only include events actions that match 25% for example.

You will likely need to fiddle around with your image height and things like that to align it just right, but the end result is a pretty nice visualisation to add into your content performance reports.